

<?php
$anadizin="C:\Program Files\EasyPHP-DevServer-14.1VC9\data\localweb\";
$dizin='attachment';
$en = 135;
$boy = 135;
$basla=microtime();
function seoimg($file,$en,$boy){
header('Content-Type: '.getimagesize($file)[mime]);
//if(getimagesize($file)[mime] == "image/gif"){header('Content-Type: image/gif');}
$oran = getimagesize($file)[0]/getimagesize($file)[1];
if ($en/$boy > $oran) {$en = $boy*$oran;}
else{$boy = $en/$oran;}
$resim=imagecreatetruecolor($en, $boy);
imagecopyresampled($resim, imagecreatefromjpeg($file), 0, 0, 0, 0, $en, $boy, getimagesize($file)[0], getimagesize($file)[1]);
if(getimagesize($file)[mime] == "image/jpeg"){imagejpeg($resim, $file, 100);}
if(getimagesize($file)[mime] == "image/png"){imagepng($resim, $file, 100);}
if(getimagesize($file)[mime] == "image/gif"){imagegif($resim, $file, 100);}
return true;
}
$liste= realpath($dizin);
$i=0;
foreach (new RecursiveIteratorIterator(new RecursiveDirectoryIterator($liste)) as $dosya)
{

				$dosya=str_replace($dizin,"../",$dosya);
        $dosya=str_replace("\","/",$dosya);
				@seoimg($dosya,$en,$boy);
				@header('Content-Type: text/html; charset=utf-8');
				$i++;
				echo " ".$i.". satır tamamlandı [".$dosya."]<br>";
}

echo $i. " satır etkilendi<br>";
$son=microtime();
echo abs($basla-$son)." saniyede yüklendi";
?>
<?php
/* NOT EASYPHP üzerinde test edilmiştir.
ÇIKTISI
1. satır tamamlandı [attachment/2012/01/5/axgjd.gif]
2. satır tamamlandı [attachment/2013/05/12/abkly.png]
3. satır tamamlandı [attachment/2014/08/24/wthop.jpeg]
.
.
22484 satır etkilendi
0.731462 saniyede yüklendi
*/
/* AYARLAR  Örn: "C:Program FilesEasyPHP-DevServer-14.1VC9datalocalwebimages" için
$anadizin="C:\Program Files\EasyPHP-DevServer-14.1VC9\data\localweb\";
$dizin='images';
$en = 135;
$boy = 135;
*/
/* Test Sonuçları
Eski Boyut: 793MB
Yeni Boyut: 198MB
21.732 Dosya 375 Klasör
*/
/* Şuanki bulunduğunuz dizini bu şekilde bulabilirsiniz
echo realpath("");
*/
?>

Konu İsmini Başlığa Yazdırmak
Bildiğiniz üzere php’de değişkeni kendisinden sonra echo ile yazdırabiliyoruz.Genelde konular body kısmında olduğu için head daki <title> tagına jquery ile ulaşıp değiştirebiliriz.
<!DOCTYPE html>
<html>
<head>
	<meta http-equiv="Content-Type" content="text/html;charset=UTF-8" />
	<script src="//ajax.googleapis.com/ajax/libs/jquery/1.11.0/jquery.min.js"></script>
</head>
<body>
	<div class="sayfam">
	<?php
	$baslik  ="Merhaba Dünya";
	?>
		<div id="baslik">
		<?php echo $baslik; ?>
		<script type="text/javascript">$(document).attr('title', '<?php echo $baslik; ?>');</script>
		</div>
	</div>
</body>
</html>

Resim Boyutlandırma (Seo Resim Optimize)
Kırpma işlemi değil, aynı oranda küçültme işlemi yapar.
Dikkat: Eski resim dosyanızı yeni boyutları ile değiştirir.
test.jpg üzerinde 250px x 250px örnek kullanılmıştır.
Not: Resim dosyalarınızın türüne göre image/jpeg ve imagecreatefromjpeg fonksiyonunu değiştirmeniz gerekebilir. Örnekte jpg ve jpeg uzantılı dosyalar için anlatım yapılmıştır.
Mime Tipleri ( image/gif image/jpeg image/png image/bmp
Fonksiyonlar ( imagecreatefrombmp, imagecreatefromgif, imagecreatefromjpeg, imagecreatefrompng)
<?php header('Content-Type: image/jpeg');
$file = 'test.jpg';
$en = 250;
$boy = 250;
$oran = getimagesize($file)[0]/getimagesize($file)[1];
if ($en/$boy > $oran) {$en = $boy*$oran;}
else{$boy = $en/$oran;}
$resim=imagecreatetruecolor($en, $boy);
imagecopyresampled($resim, imagecreatefromjpeg($file), 0, 0, 0, 0, $en, $boy, getimagesize($file)[0], getimagesize($file)[1]);
imagejpeg($resim, $file, 100);
?>
<?php
//KONTROL
header('Content-Type: text/html');
echo '<img src="test.jpg">';
?>
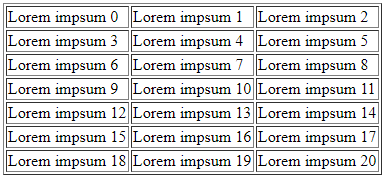
Array Chunk ile Döngüdeki Tabloyu Sütunlara Ayırmak
21 tane verimiz olduğunu var sayarsak ($veri) ve bunu tabloda 3 sütuna bölmek istersek ($ayir) kodlar bu şekilde olacaktır.
<?php
$veri=21;
for($x=0;$x<$veri;$x++){
 $ornekveri[] = "Lorem impsum ".$x;
};
$ayiralim=3;
echo '<table border="1">';
foreach (array_chunk($ornekveri, $kaca_ayiralim) as $dizi) {
 echo "<tr>";
 foreach ($dizi as $deger) {
  echo "<td>".$deger."</td>";
 }
 echo "</tr>";
}
echo '</table>';
?>

Codeigniter Anchor() Kullanımı
Kullanımı
<?php
$url="http://ulusanyazilim.com";
$title="PhpState";
$description="PHP Dünyası";
echo anchor($url, $title,'title="'.$description.'"');
?>
Çıktısı
<a title="PHP Dünyası" href="http://ulusanyazilim.com">PhpState</a>

Adresten Alan Adı Almak
<?php
function urltemizle($url){
$domain=strtolower($url);
$domain= preg_replace(array('~^https?://~si' ,'~[/:#?;%&].*~','~.$~',),'',$domain);
if(preg_match('#^www.(.*)#i',$domain)){$domain=preg_replace('#www.#i','',$domain);}
$domain="http://".$domain;
return $domain;
}

echo urltemizle("http://phpstate.ulusanyazilim.com/index.php");
//Çıktısı phpstate.ulusanyazilim.com

?>

Array veya Object Dönüştürme
Array Örnek
$data=Array([ad] => phpstate);
Object Örnek
$data=stdClass Object([ad] => phpstate);
<?php
function object_to_array($data)
{
    if (is_array($data) || is_object($data))
    {
        $result = array();
        foreach ($data as $key => $value)
        {
            $result[$key] = object_to_array($value);
        }
        return $result;
    }
    return $data;
}

////////////////////////////////////////////////////
function array_to_object($data)
{
    if (is_array($data) || is_object($data))
    {
				$result= new stdClass();
				foreach ($data as $key => $value)
				{
				$result->$key = array_to_object($value);
      }
        return $result;
    }
    return $data;
}
?>
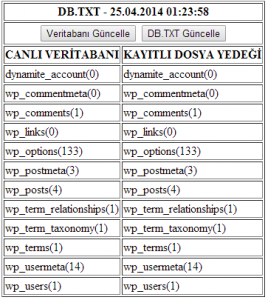
Son Yapılan İşlemin Hangi Veritabanına Eklendiğini Kontrol Etme
Kendi ihtiyacımdan dolayı yazdım.Hazır scriptlerdeki karmaşık form kayıtlarının hangi veritabanına eklediğini bulmak için geliştirdim.Umarım işinize yarar.
<?php
/*#####################AYARLAR################################*/
$dbname = 'wp';//veritabanı adı
mysql_connect('localhost', 'root', 'mysql');//bağlantı bilgiler
/*############################################################*/

header('Content-Type: text/html; charset=utf-8');
date_default_timezone_set('Europe/Istanbul');
mysql_select_db($dbname);
$sql = "SHOW TABLES FROM $dbname";
$result = mysql_query($sql);
$filename = 'DB.TXT';
if(@$_GET['delete']){
if(is_file($filename)) {
	unlink($filename);
}elseif(@$_GET['update']){
header("Location: index.php");
}else{header("Location: index.php");}
}
if (!file_exists($filename)) {
	$file = fopen($filename, 'w');
	while ($row = mysql_fetch_row($result)) {
		$r = mysql_fetch_array(mysql_query("SELECT count(*) as c FROM ".$row[0]));
		$total = $r["c"];
		fwrite($file, $row[0]."(".$total.")" . "n");
	}
	fclose($file);
	header("Location: index.php");
}else{
$fp = @fopen($filename, 'r');
if ($fp) {
   $array = explode("n", fread($fp, filesize($filename)));
}
	$i=-1;
	echo '<table border=1>
	<tr><th colspan=2>'.$filename.' - '.date("d.m.Y H:i:s",filemtime($filename)).'</th></tr>
	<tr><th colspan=2>
	<button onclick="javascript:location.href='index.php?update=ok'">Veritabanı Güncelle</button>
	<button onclick="javascript:location.href='index.php?delete=ok'">DB.TXT Güncelle</button>
	<tr><th>CANLI VERİTABANI</th><th>KAYITLI DOSYA YEDEĞİ</th></tr>';
	while ($row = mysql_fetch_row($result)) {
		$i++;
		$r = mysql_fetch_array(mysql_query("SELECT count(*) as c FROM ".$row[0]));
		$total = $r["c"];
		echo "<tr>";
		echo "<td>";
		echo $row[0]."(".$total.")";
		echo "</td><td>";
		echo $array[$i];
		echo "</td>";
		echo "</tr>";
	}
	echo "</table>";
}
?>
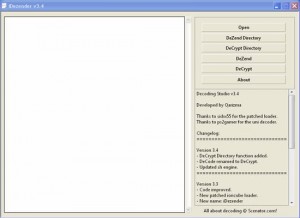
iDezender v8.1 ioncube Decoder Full Sürüm
iDezender v8.1 programı ile İoncube dosyalarınızı Decode edebilirsiniz.
Kurulum:
1).- Install iDezender_v8.1_Pro_setup.exe
2).- Kurulum aşamasında serial.txt dosyasındaki şifreyi girin devam edin
3).- Hepsi bu kadar.
İndir;
Yandex üzerinden: http://yadi.sk/d/V3j41p_OKUgoi
PhpState üzerinden: http://phpstate.ulusanyazilim.com/download/iDezender_8.1_PRO.rar
Son Güncelleme(updated):05.12.2014

Internet Explorer için RGBA Renk Oluşturma
Eski Internet Explorer tarayıcılar için RGBa kullanma mantığını ele alacağız.
background: rgba(255, 255, 255, 0.3); <br>filter: progid:DXImageTransform.Microsoft.gradient(GradientType=0,startColorstr='#4cffffff', endColorstr='#4cffffff');
Str=># 4cFFFFFF=>opacity+renk
Örnekte görüldüğü üzere start ve end color str hex değerlerinde ff rengi, 4c opacity i belirtiyor.
mesela rgba(0,0,0,1) için #ff000000 veya rgba(255,255,255,1) için #ffffffff
rgba(0,0,0,0) için #00000000 veya rgba(255,255,255,0) için #00ffffff
rgba(0,0,0,0.3) için #4c000000 veya rgba(255,255,255,0.3) için #4cffffff
Opacity mantığı
hex değerleri bu karakterlerden oluşur=>fedcba9876543210
255 renk için opacity değerleri
0.1 opacity=25.renk=19
0.2 opacity=51.renk=33
0.3 opacity=76.renk=4c
0.4 opacity=102.renk=66
0.5 opacity=127.renk=7f
0.6 opacity=153.renk=99
0.7 opacity=178.renk=b2
0.8 opacity=204.renk=cc
0.9 opacity=229.renk=e5
ff=0 opacity’e eşittir,00=1 opacity’e eşittir
Hex değeri nasıl hesaplarım?
<?php $opacity=0.7;//buraya istediğiniz değeri girin.Ben 0.7 yaptım
$renkbul=floor(255*$opacity);
echo $renkbul.".renk hex =>".dechex($renkbul);//çıktısı 178.renk =>b2
?>
<style>
body{
	/*0.7 opaklığa sahip siyah için*/
	background: rgba(255, 255, 255, 0.7); /* diğer tarayıcılar */
	filter: progid:DXImageTransform.Microsoft.gradient(GradientType=0,startColorstr='#b2000000', endColorstr='#b2000000'); /* IE */
}
</style>